

You're probably standing in the driveway right now with two versions of the same dream in your head. One is the glossy one. A tidy old VW with the side door open, kettle on, boards strapped up top, sunset throwing honey-coloured light across the dash. The other is the practical one. A van with tired trim, mystery wiring, a patch of rust near the sill, and a notebook full of half-finished sketches.
That's how most camper van conversion stories begin in Australia. Not with perfection. With affection.
At local shows, I always end up chatting to someone who's torn between keeping a classic Volkswagen untouched and turning it into something they'll use. My answer is always the same. If the van's meant to travel, build it to travel well. Respect the shape, respect the history, but make it yours. A good conversion doesn't erase the soul of a Kombi. It gives it another chapter.
The charm is already there. Australia formally welcomed the Volkswagen Beetle in 1953, and local assembly started at Clayton in Victoria in 1954 on the very next beat of that story, as noted in this Beetle history entry. The Type 2 story has its own local flavour too. In Australia, the passenger van version was marketed as the VW Kombi, while the utes and commercial carriers wore the VW Transporter name, as explained in this Australian Kombi overview. That distinction still matters when you're choosing a base for a camper van conversion, because the badge on the nose often hints at how the vehicle was originally used, loved, and worked.
The Blueprint for Your Dream Rig
A proper build starts long before the first screw goes in. It starts when you realise what sort of traveller you are.
Some people want a weekend surf wagon. Bed, storage, coolbox, nothing fussy. Others want a rolling little cottage with solar, water, cupboards, and enough comfort to disappear for days. If you skip that decision and buy only with your heart, you can end up with the wrong van for your own habits.
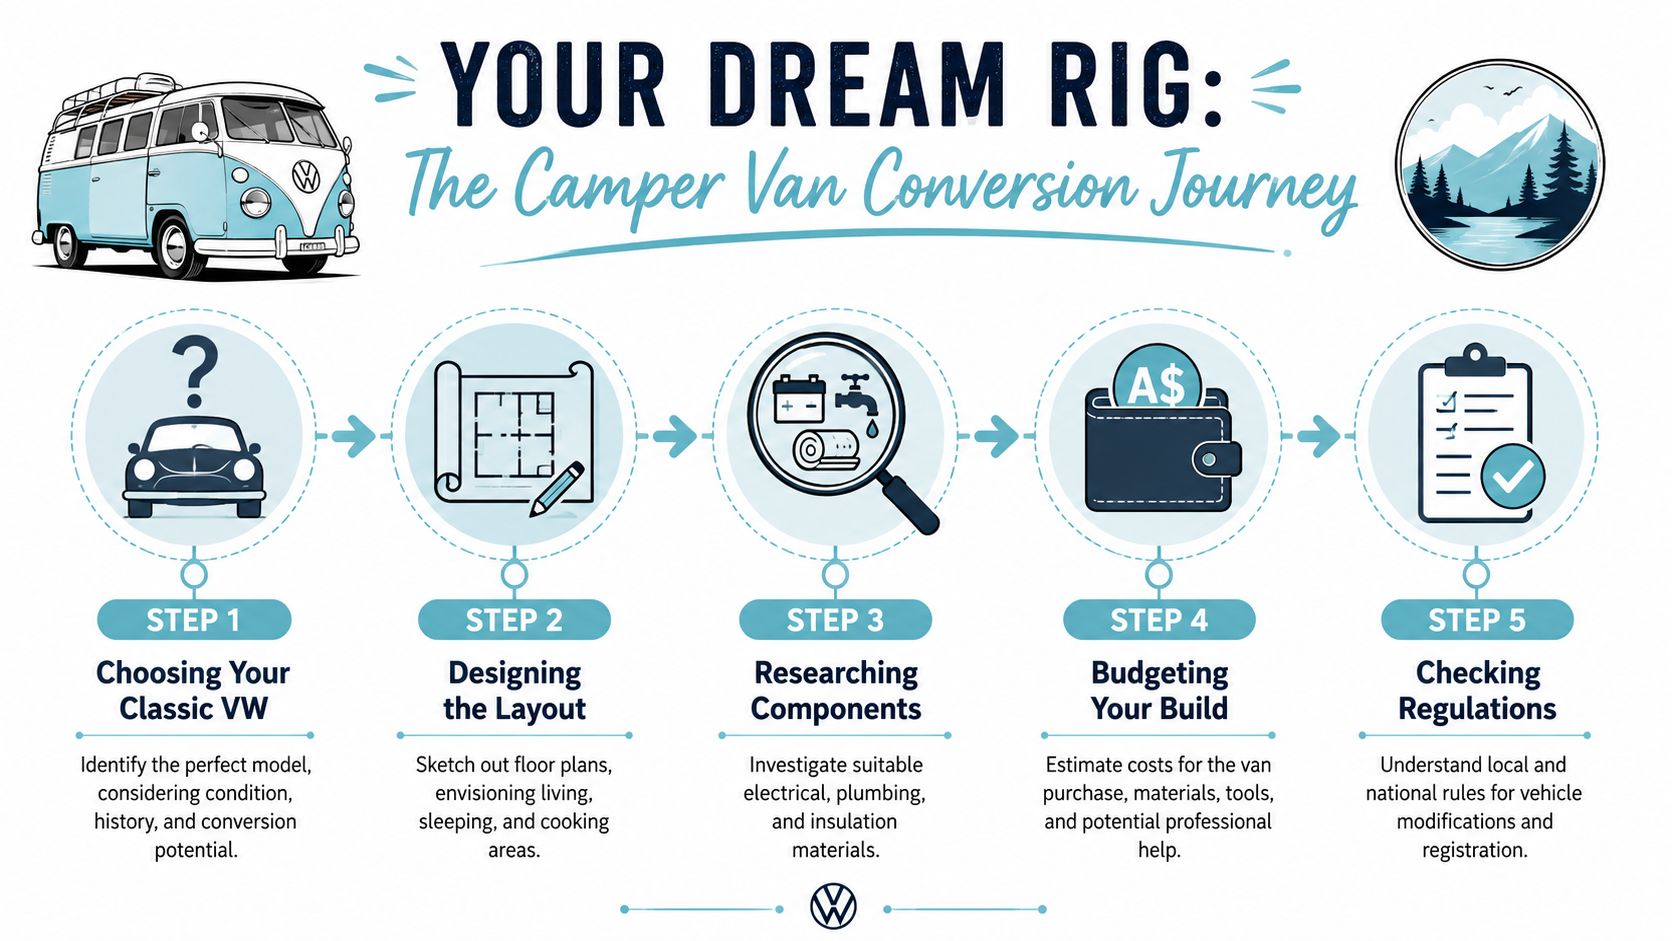
Choosing the right classic VW
The romance often points straight at a Kombi, and fair enough. Nothing else wears the road-trip grin quite like it. But nostalgia needs a partner called practicality.
A few starting points help:
- Original use matters. A passenger-spec Kombi often gives you a different starting point from a harder-worked commercial Transporter.
- Body condition beats pretty paint. Fresh paint can hide trouble. Solid metal saves misery.
- Mechanical honesty counts. A van that starts, stops, and tells the truth is better than one with dazzling trim and a long list of promises.
- Parts confidence helps. If your comfort with tools is modest, choose a base that won't frighten you every time something rattles.
If you're still hunting, it helps to browse a dedicated van for conversion shortlist and compare body styles with your intended use rather than just your favourite photos.
Practical rule: Buy the van that suits your trips, not the one that only suits your daydreams.
Sketch the life before the layout
I've seen beautiful builds that were awkward to live in because the owner designed them like a furniture catalogue instead of a moving campsite. Before you measure timber, measure habits.
Ask yourself where you'll make tea when it's raining. Where you'll throw sandy thongs. Whether you want to sit upright inside with the door shut. Whether the bed stays made, or folds into a bench. Whether storage needs to swallow tools, fishing gear, camera kit, or a little box of treasured VW bits from swap meets.
A simple planning sequence keeps things honest:
- Mark your fixed needs. Bed length, cooking spot, and the gear you always carry.
- Draw walking space. Tiny vans feel smaller once cupboards go in.
- Decide your must-haves. Fridge, sink, surfboard slot, reading light.
- Leave room for maintenance. Access panels save arguments with your future self.
- Plan for weight and compliance early. Last-minute heavy additions can spoil the build.
Match the build to the story you want
A weekend warrior can stay charmingly simple. A longer-haul touring van asks more of the design. That's where the blueprint earns its keep. Once the sleeping, cooking, and storage zones are settled on paper, every later choice becomes clearer. You stop guessing and start building with purpose.
Building the Bones of Your Van
The glamorous photos never show the first filthy weekend. Seats out. Old lining peeled back. Dust in your hair. Surface rust staring at you like a smirk from the past. This is still one of my favourite phases, because it's the moment a van stops being “an old bus” and starts becoming your bus.
Strip it back and read the shell
Pulling out worn flooring and trim tells you what sort of life the van has lived. You'll find old screw holes, odd repairs, and sometimes the remains of someone else's half-finished dream. Don't rush this stage. Clean every surface and inspect the shell properly before you bury anything behind timber and panels.
Rust deserves patience. Treat what you can see now, because hidden rust doesn't become charming later. It becomes expensive.
A good bones-first approach usually looks like this:
- Remove old interior pieces carefully. You may want templates, fixings, or reference points later.
- Check every floor edge and seam. Moisture loves corners.
- Test mounting points. Bed frames and cabinetry need trustworthy anchors.
- Keep notes as you go. Label wiring routes, holes, and factory features before the shell disappears behind your fit-out.
Build a floor that feels solid
The floor changes the whole character of the van. Get it wrong and every step feels hollow, cold, or noisy. Get it right and the build starts to feel planted.
The subfloor is more than a sheet of board. It's the base layer that evens out irregularities, supports the finished floor, and helps the van feel quieter under way. I've seen people race to the visible finishes and regret it later when the floor creaks, flexes, or lifts at the edges.
A quick comparison helps:
| Part | What it does | What happens if you rush it |
|---|---|---|
| Floor prep | Gives you a clean, sound base | Trapped moisture and hidden corrosion |
| Subfloor | Adds structure and support | Soft spots and movement underfoot |
| Wall panels | Shape the cabin and cover insulation | Rattles and poor fit around curves |
| Ceiling lining | Finishes the shell overhead | Sagging panels and awkward gaps |
A neat timber finish can hide a bad foundation for a while. The first rough road will reveal it.
Keep the structure serviceable
A strong build also stays accessible. Don't entomb critical areas. Leave paths to wiring runs, wheel arches, and any area you may need to inspect later. Old Volkswagens reward builders who think like caretakers rather than decorators.
By the end of this phase, the van still won't look finished. That's fine. What you've done is harder to photograph and far more important to live with.
Insulation and Airflow for Aussie Climates
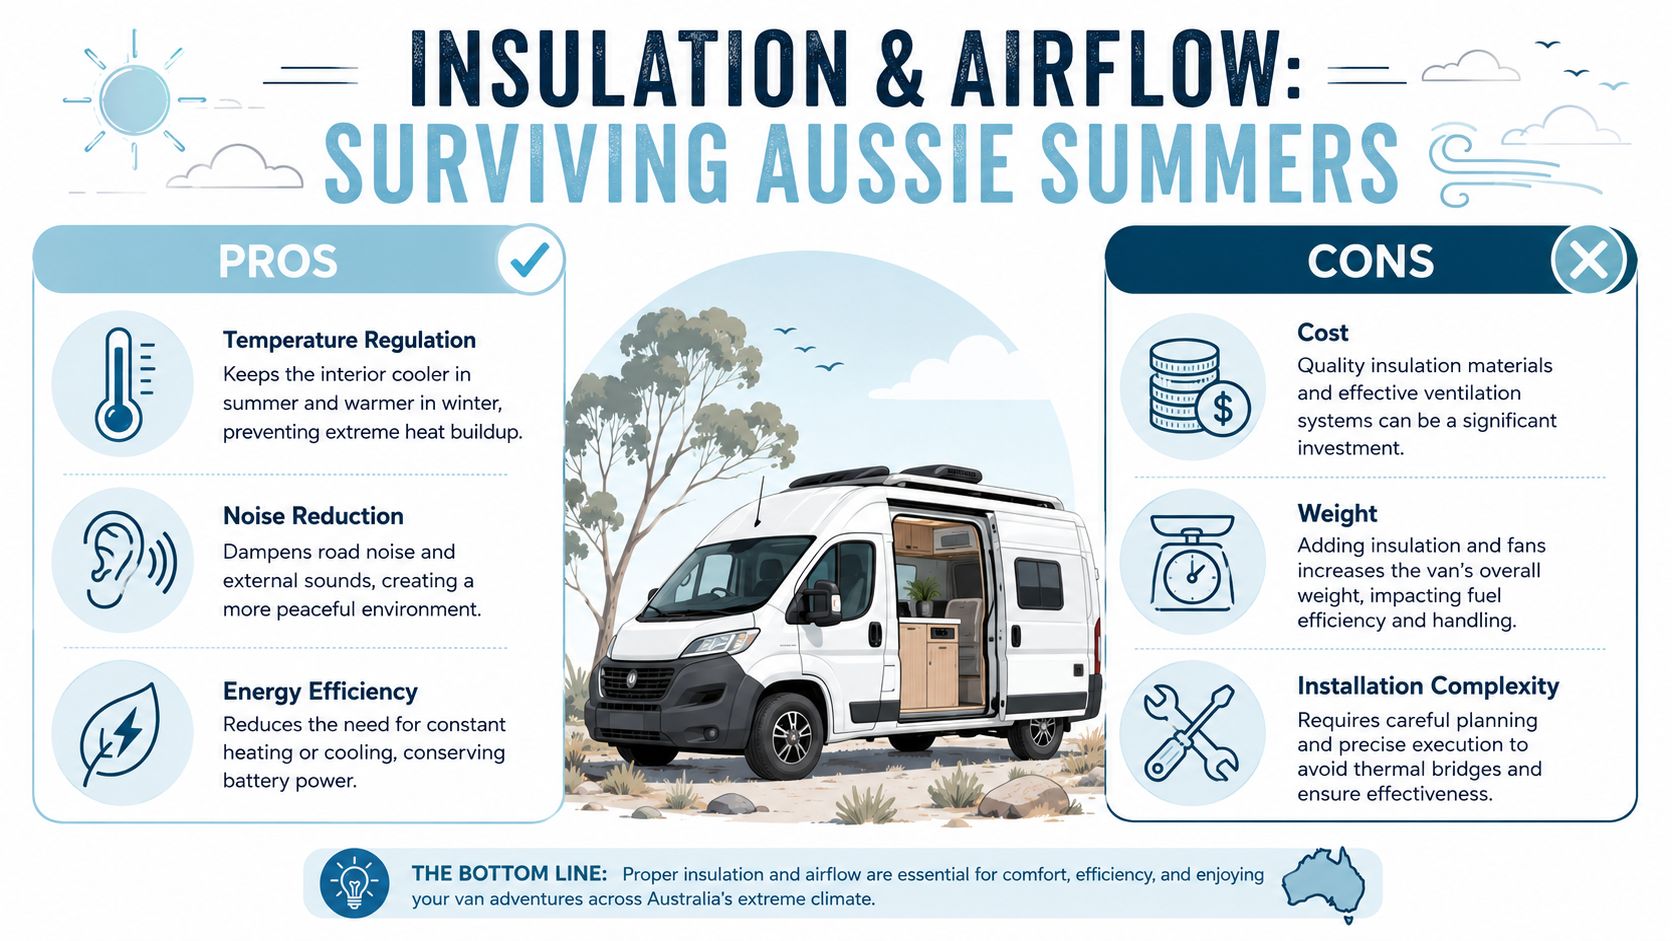
Australia is merciless with badly insulated vans. A metal shell left half-done turns savage in summer and clammy in winter. This is the stage where many first-time builders cut corners because insulation feels invisible. Then they spend their first trip sweating, wiping condensation, and wondering why the floor feels like an ice tray at dawn.
Cover every bit of bare metal
One of the most common mistakes in an Australian camper van conversion is leaving sections of metal exposed. According to this van build guide on insulation practice, the recommended approach is a two-layer system. First comes an adhesive closed-cell foam layer with aluminium backing, 1–2cm thick, covering the full interior. Then comes a second reflective layer, often called Reflectix.
That advice sounds fussy until you've camped through a hot spell or a cold snap. Any skipped patch becomes a weak point. Heat barges in. Condensation gathers. The van feels unsettled and damp.
If you're comparing materials for your own van insulation options, focus less on marketing language and more on full coverage, clean fitment, and how the layers work together.
Airflow isn't optional
Insulation solves only half the problem. A van also needs to breathe.
Warm air from cooking, sleeping, and wet towels has to go somewhere. If it can't leave, it turns into moisture on glass and steel. That's when mould, stale smells, and general misery arrive. Good airflow can be simple, but it has to be deliberate. A roof vent, smart window habits, and clear air paths matter more than decorative extras.
Consider the trade-offs in plain terms:
- Closed-cell foam gives dependable coverage and helps with heat control.
- Reflective layers support radiant heat management when fitted neatly.
- Vinyl flooring with foam underlay can improve comfort underfoot when paired correctly, which matters in dusty Australian conditions noted in the same build guide.
- Ventilation openings protect the interior from trapped moisture, even when the weather isn't dramatic.
Skip insulation and the van works against you. Add insulation without airflow and the van still wins.
Comfort changes the whole trip
People talk about engine notes, paint colours, and clever storage. Fair enough. But cabin comfort shapes every hour you spend inside. A well-insulated van settles down at night. It sounds calmer. It feels more controlled. It gives you the sort of quiet comfort that makes a short trip feel longer and a rough day easier.
That's why this part deserves care. You won't show it off much at a meet, but you'll thank yourself every morning.
Powering Your Adventure and Keeping the Water Flowing
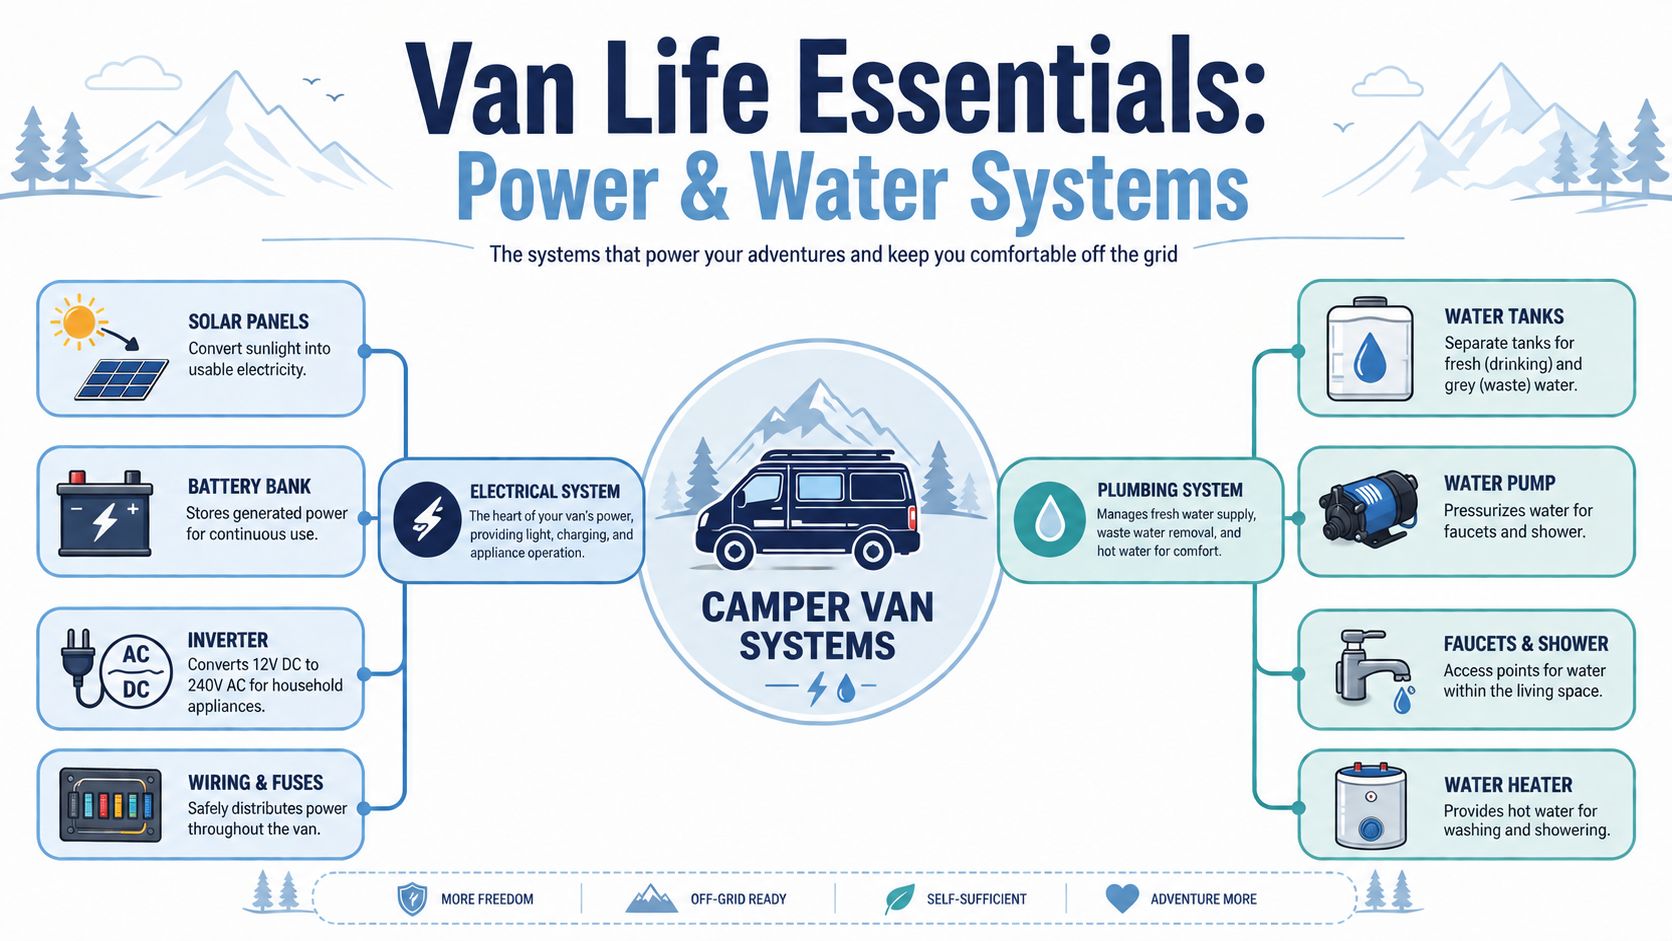
This is the point where the van stops being a shell with furniture and starts acting like a tiny home. Lights flick on. A fridge hums. Water runs. The first time that happens, even a grizzled old VW hand feels a bit smug.
Start with simple electrical maths
Electrical planning frightens people because they picture black magic. In most DIY camper van conversion work, it starts with a list and some basic arithmetic.
The benchmark used in Australian DIY guidance is clear. Work out your daily power use in watt-hours, divide by six hours of proper sunlight per day, then round the required solar wattage up by 20% to cover shade parking or heavier use, according to Camplify's Australian van conversion guide.
Here's the practical shape of that process:
- List each device you'll use in a day.
- Convert usage into watt-hours for the full daily load.
- Divide by six to estimate panel wattage for Australian conditions.
- Add 20% headroom so the system isn't constantly on the edge.
- Choose battery capacity based on how long you want to stay off-grid.
That same guide also outlines the battery side. Divide your watt-hours by system voltage to get amp-hours, then multiply by your desired autonomy days. It gives the example of 960Wh divided by 12V, then expanded by 2 days of autonomy. That's the kind of tidy working you can follow without pretending to be an auto sparky.
If you're planning a larger touring setup, a slim battery format such as this 200 Ah slimline lithium battery gives you a useful reference point for how modern storage solutions fit tighter spaces.
To see the systems thinking in action, this walkthrough is handy:
Wire for vibration, not just theory
Classic Volkswagens don't live pampered lives. They buzz, bounce, and vibrate. The Australian guidance above notes chassis mounting with self-tapping screws and shake-proof lock washers to reduce vibration-related issues. That's the sort of detail that separates a clean weekend install from a long-term reliable one.
Use fuses, tidy cable runs, and accessible shut-offs. Build so you can troubleshoot later without dismantling half the interior.
Small electrical choices become big reliability stories on corrugated roads.
Keep plumbing as simple as your trips allow
Not every van needs a pressurised palace. Some of the happiest setups use a basic sink, portable fresh water, and a simple waste container. Others justify pumps, fixed tanks, and more integrated plumbing because the van stays out longer and does more work.
A practical comparison looks like this:
| Setup style | Best for | Character |
|---|---|---|
| Hand-pump sink | Weekend trips | Simple, light, easy to maintain |
| Electric pump and fixed tanks | Longer touring | More convenience, more planning |
| Minimal water storage | Day use and quick overnighters | Fast to fill, easy to clean |
| More developed water system | Multi-day living | Better comfort, more components |
Build the system that suits your use, not the one that wins the loudest applause online.
Custom Cabinetry and Clever Storage Solutions
Cabinetry is where a camper van conversion gets its personality. Up until now, you've been protecting the shell, taming temperatures, and making the systems behave. Then one Saturday afternoon you dry-fit a bench, stand back, and suddenly the van feels hospitable.
I remember a split-screen build at a show years ago. On one side was a tidy but generic fit-out with square cupboards and dead space everywhere. On the other was a home-built interior in pale ply, curved corner shelves, a bench seat that turned into a bed, and hidden cubbies under the base for tools, leads, and camp gear. The second one wasn't fancy. It was thoughtful. That's why everyone kept peering inside.
Make each piece earn its spot
In a small van, furniture can't be lazy. A bench should store something. A bed base should lift, slide, or open. A galley should leave room to stand without twisting like a circus act.
The best cabinetry choices often follow these patterns:
- Lightweight plywood keeps the fit-out manageable without making the van feel top-heavy.
- Vertical storage turns dead wall space into shelves, spice racks, or slim lockers.
- Lift-up bed bases make bulky items easier to reach than deep front-opening boxes.
- Curved edges and rounded corners feel kinder in a tight cabin and suit classic VW lines.
Build around daily rituals
I like to judge a layout by tiny repeated moments. Can you reach the kettle without unpacking the bed? Can you grab a jumper at night without unloading half the van? Can the passenger seat still feel like a seat, not a barricade?
Those questions shape cabinetry better than any trendy fit-out phrase. One owner I met had built a narrow side cabinet just deep enough for enamel mugs, a torch, maps, and two weathered workshop manuals. Another used the void beside the wheel arch for a slide-out pantry. Neither solution looked showy. Both made the van easier to inhabit.
Good cabinetry doesn't just store gear. It reduces friction in the day.
Leave room for the van's character
Old Volkswagens already carry a strong personality. Cabinetry should work with that, not smother it. Keep sightlines to the windows. Don't overbuild until the interior feels like a timber corridor. Let the curves of the body still speak.
That balance is part craft, part restraint. A van should feel lived in, not packed to the roof with cleverness.
Styling with Classic VW Memorabilia and Diecast Decor
Once the practical work is done, you can finally have a bit of fun with the soul of the thing. At this stage, the build shifts from “nice conversion” to “that's your van, isn't it?”
The easiest mistake is going overboard and turning a beautiful old camper into a novelty shop. The better move is to use a few VW touches that feel earned. Think of them as punctuation marks, not wallpaper.
Let small objects tell the story
A finished van always benefits from personal details with history behind them. In a Volkswagen-themed interior, diecast models work beautifully because they echo the actual machine without shouting over it.
A few styling ideas that suit a classic VW camper:
- A compact display shelf near the rear cabinet for a licensed Kombi or Samba Bus model.
- A Beetle model on a dash shelf or overhead nook where it catches the morning light.
- A small framed Volkswagen print or badge display tucked into the galley wall.
- A themed storage tin or tray for keys, coins, and campsite odds and ends.
Collectors know the appeal already. A VW Kombi diecast Australia search usually starts as a gift hunt and ends as a shelf problem. That same instinct can soften a van interior. One carefully placed Volkswagen Beetle model can make a timber cabinet feel like part workshop, part memory box.
Match decor to the van, not just the brand
A bright Flower Power piece suits some builds and jars with others. A patinated split-window look calls for subtler accents. A surfy beach-runner can carry bolder colours and playful details. The trick is to style in harmony with the van's mood.
A simple pairing guide helps:
| Van mood | Decor that fits |
|---|---|
| Restored classic Kombi | Heritage-style VW art, muted diecast pieces |
| Beachy cruiser | Colourful Kombi models, surf-inspired VW accents |
| Workshop-inspired build | Badge displays, manuals, metal signs |
| Minimal touring interior | One or two licensed models, restrained shelf styling |
Keep it stable and useful
Anything decorative in a camper still has to survive the road. Use secure shelves, non-slip liners, and enclosed nooks for display items. If you're going to buy diecast Kombi pieces for the van itself, choose spots that won't send them skittering across the cabin at the first roundabout.
That's also why VW memorabilia collectibles work best when they're folded into useful features. A model on a lip shelf above the kitchen. A tiny framed piece above a book cubby. A Beetle tucked into the end of a cabinet beside a torch and a map. It should feel like the owner loves Volkswagens, not like the van is trying too hard to prove it.
Done well, the styling becomes the final handshake between machine and memory. That's when the conversion feels complete.
Navigating Aussie Regulations and Your Budget
The last stretch of a camper van conversion often feels less romantic than the first. There's paperwork, state rules, engineering questions, and the sharp reality of what the build has cost. It's still part of the craft. A van isn't finished when the curtains go in. It's finished when it's legal, insurable, and financially understood.
What the build can cost
Australian costs vary wildly by ambition. For 2026 projections, Rising Rides reports that camper van conversion costs range from $3,000 for a basic DIY setup to over $60,000 for a full professional touring conversion. The same source places a comfortable mid-range build at $10,000 to $25,000 for the conversion alone.
That spread tells an honest story. A simple weekend setup is one thing. A touring fit-out with proper systems, cabinetry, and finish quality is another. Builders often underestimate how quickly small purchases stack up. Timber, fasteners, flooring, sealants, electrical protection, plumbing fittings, trim pieces, and rework all have a habit of joining the tally.
State rules can trip you up
Australia doesn't give DIY builders one tidy national rulebook in practice. State-by-state differences in compliance can catch people badly if they treat registration, gas work, electrical changes, and modification approvals as a generic checklist.
That matters because confusion around compliance has been identified as a major reason projects get abandoned, and many guides still don't map the differences clearly. If your build includes gas or major electrical work, get proper local advice before the interior closes up. It's cheaper to ask early than to undo finished work later.
Insurance needs proof, not hope
Insurance is another area where people get casual at exactly the wrong moment. Standard vehicle cover may not respond kindly to uncertified DIY modifications. If your build includes significant changes, document them properly, keep receipts, photograph each stage, and ask insurers direct questions about converted vehicles before assuming you're covered.
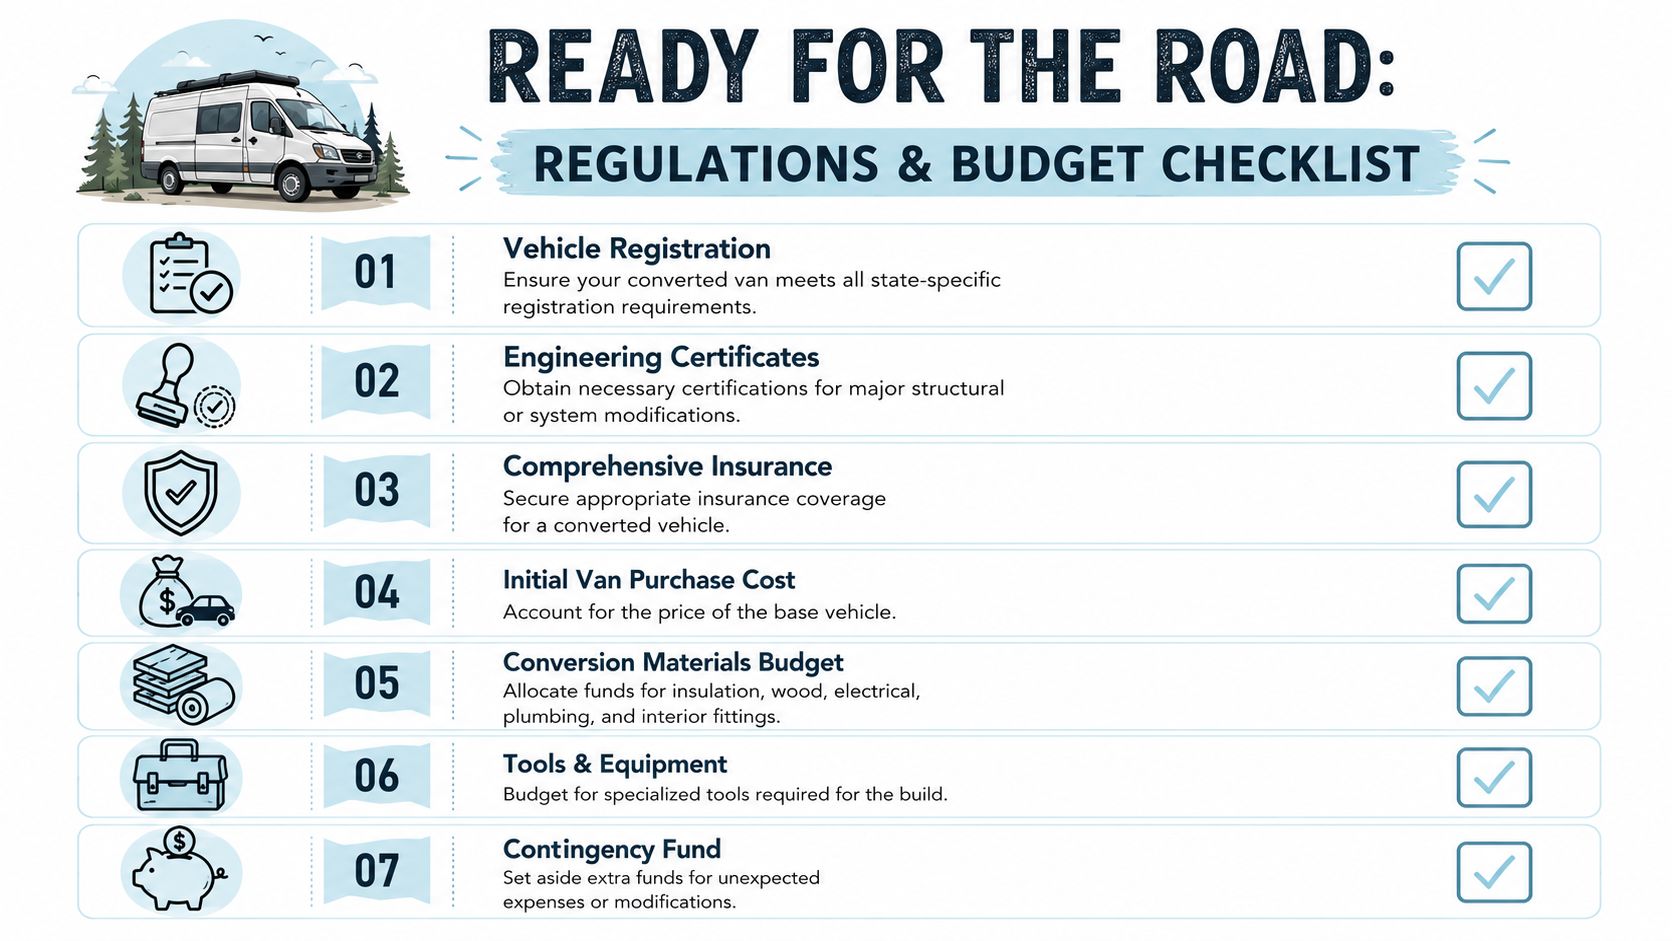
A short checklist keeps the risks in view:
- Confirm state-specific registration requirements before the build is final.
- Check certification needs for gas, electrical, and structural changes.
- Document the conversion with photos, receipts, and component details.
- Ask insurers how they treat DIY modifications and certified work.
- Budget for surprises, because old vans always have opinions.
If the build bug has bitten hard and you want the finishing touches that celebrate the old VW spirit, have a look through Volkswagen Memorabilia. It's a strong local option for officially licensed Volkswagen diecast models for sale, Kombi and Beetle gifts, and display pieces that suit a shed, shelf, or freshly finished camper. For Australian buyers, the local stock and fast shipping are a real advantage, especially when you want your next VW piece without the long wait.