

A mate at VW Nationals once pointed from a weathered Splitty to a tidy modern Caddy in the next row and said, “That's the same dream, just with cupholders and a warranty.” He wasn't joking. By lunchtime we were talking bed platforms, storage drawers, and whether a little van like that could carry the old Kombi spirit into a modern Aussie road trip.
Dreaming Up Your Caddy The Modern-Day Kombi
The old Kombi still owns a special corner of the brain. You see one parked up by the coast and suddenly life looks simpler. Boards on top, kettle on the stove, nowhere urgent to be. A VW Caddy van camper taps into that same feeling, but it does it in a shape that fits real life now. School run on Friday. Camp spot on Saturday.
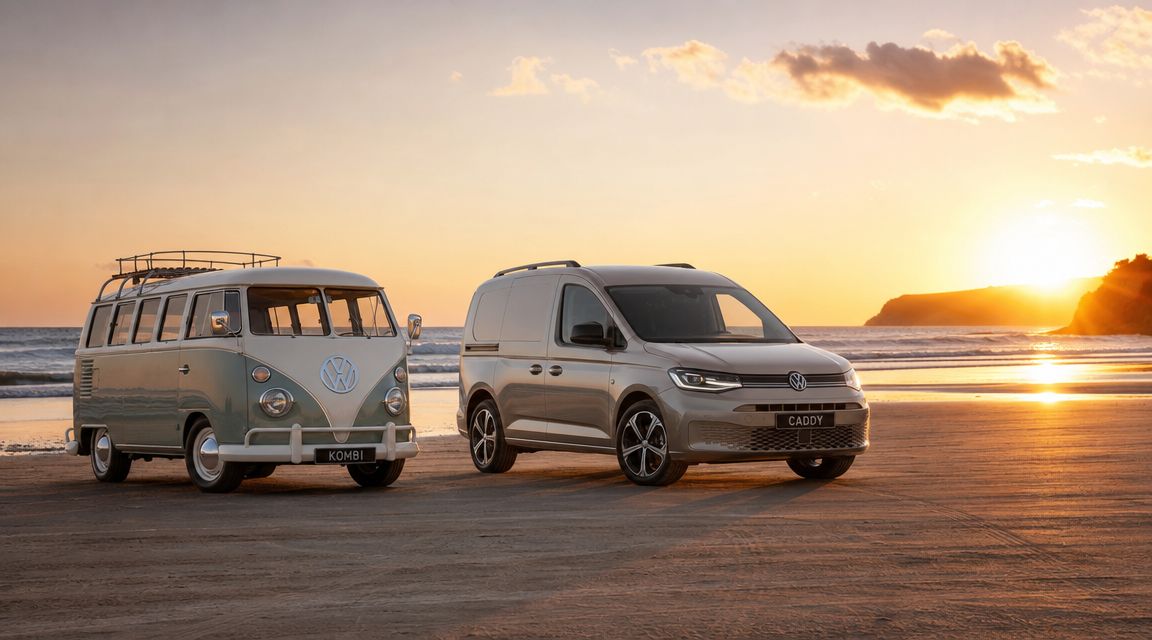
Volkswagen's modern Caddy California sits in the California camper family and is based on the fifth-generation Caddy. Volkswagen's UK brochure describes it in both short wheelbase and California Maxi long wheelbase forms, and as a platform designed to sleep two adults in comfort in camper trim, which tells you exactly why so many people see it as a smart small-scale camper base (Volkswagen Caddy California brochure).
Start with your trip, not your timber
One bloke I know wanted to copy a full campervan layout into a Caddy. Fixed bed, cabinets, permanent cooker, the lot. On paper it looked brilliant. In reality, it would've turned a handy daily driver into a cramped box. He pulled back, got honest about how he travels, and the plan changed.
That's the first move. Ask what kind of weekends you want.
- Surf wagon. Bed, board storage, clothes tub, simple lighting.
- Couple's weekender. Fold-out sleeping platform, water, portable cooker, privacy screens.
- Event runner. Space for chairs, an awning, camera gear, and muddy shoes after a day at a show.
The best Caddy builds don't try to become big motorhomes. They stay compact on purpose.
Pick the right base before you buy gear
The dream gets expensive when people buy parts before measuring. The shape of your vehicle decides everything. A shorter wheelbase build pushes you toward tighter, more modular furniture. A longer body gives you more breathing room. If you're using the vehicle through the week, that matters.
A useful early stop is looking at a van for conversion and studying how much room you really have for sleeping, storage, and access. Not glamorous, but it saves headaches later.
Sketch it like an old coachbuilder
Grab masking tape, cardboard, and a notepad. Mark out where your bed might fold. Open the rear hatch. Try to “cook” from the back. Pretend it's raining and ask where wet shoes go. Ask where you'll keep your phone at night. Those tiny details decide whether the build feels thoughtful or annoying.
If you're the nostalgic type, this is also the fun part. Plenty of people pull ideas from classic VW campers. Not a full retro copy. More the spirit of it. Simple spaces, clever storage, and everything earning its place.
For inspiration, some VW fans even keep a little classic model on the shed shelf while planning. A Kombi diecast has a funny way of reminding you what made the old campers great in the first place. Clean packaging. Smart use of space. Adventure baked into the silhouette.
The Foundation Insulation Ventilation and Sound Deadening
A bare van feels romantic for about one night. Then the metal skin sweats, the road noise rings through the panels, and every gust of wind reminds you you're sleeping in a steel box. The comfort of a Caddy camper starts long before the mattress goes in.
Insulate for real conditions
Australia gives you warm coastal nights, cold inland mornings, and plenty in between. Insulation helps slow heat transfer, but the job isn't just “make it warm”. It also helps soften temperature swings and tame condensation.
A simple approach works well:
- Clean every surface first. Dust and grease ruin adhesion.
- Apply sound deadening selectively to larger flat panels where vibration is worst.
- Add insulation layer by layer without crushing it into every cavity.
- Leave room for airflow where moisture could otherwise get trapped.
- Refit trim carefully so nothing rattles later.
A lot of first-time builders overdo the heavy stuff and underdo the planning. You don't need to fill every hidden void with random material from the hardware shop. You need a neat, dry, serviceable build.
If you're comparing materials and methods, a page on insulation for van conversions is a sensible place to sort the basics before buying rolls, sheets, and tape.
Ventilation is not optional
Insulation makes the van nicer. Ventilation makes it liveable.
Two people sleeping in a compact van create moisture fast. Even a solo sleeper with wet towels, sandy gear, or a late-night cuppa can wake to damp glass and stale air. The cure is controlled airflow, not wishful thinking.
Practical rule: if air can't move through the van overnight, condensation will choose where to settle for you.
Good ventilation usually comes from combining a cracked window, insect protection, and a layout that doesn't block natural air paths. If you cook near the vehicle, airflow matters even more. Don't design the sleeping setup so tightly that every opening becomes awkward to use.
Sound deadening changes the feel of the van
This is the least visible upgrade and one of the most satisfying. The tinny clang disappears. Doors shut with more weight. Rain sounds softer. Highway runs become less tiring. That calmer feel is a big part of why some compact camper conversions seem polished while others still feel like delivery vans with a mattress chucked in the back.
Keep it tidy:
- Target large panels rather than covering every square centimetre.
- Press material down firmly so it bonds properly.
- Avoid blocking drainage paths around doors and lower body sections.
- Check trim clips and fasteners before reassembly, because rattles often come from loose fittings rather than the panel itself.
A good foundation won't get likes on social media the way a slide-out kitchen will. But it's the difference between “we camped in the van” and “we slept well”.
The Heart of the Camper Sleeping Platforms and Storage
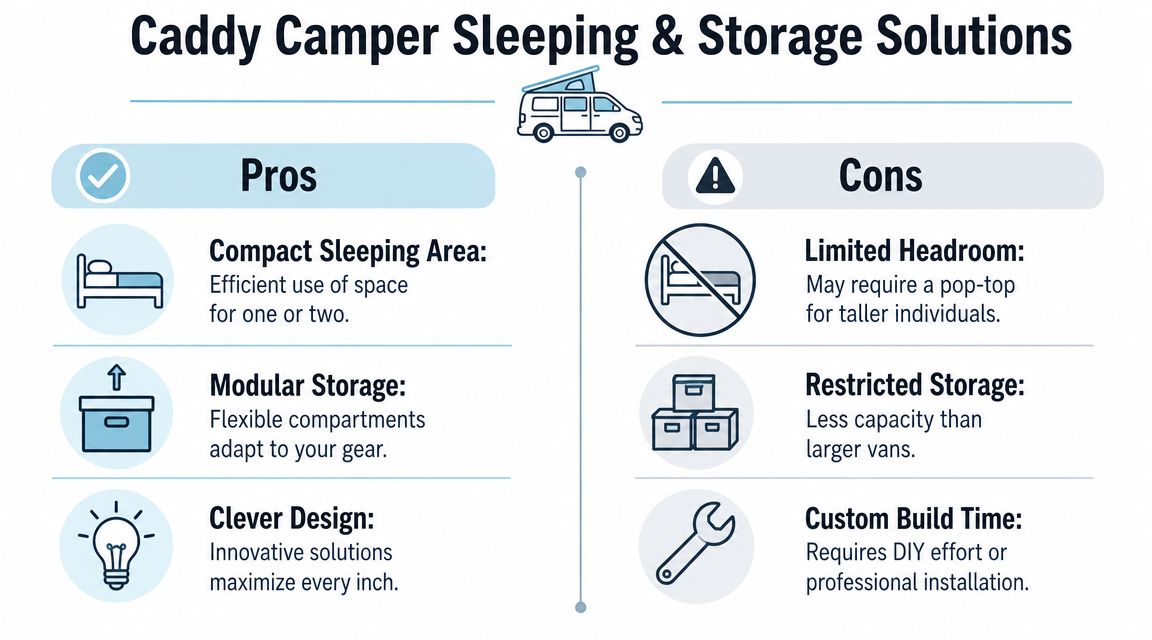
The bed is where the argument always starts. Fixed or folding. Timber or aluminium. Drawers or tubs. Every VW Caddy van camper build ends up here, for it determines whether space is won or lost.
Volkswagen lists the Caddy passenger layout with 191–446 litres of luggage capacity, depending on configuration, which explains why removable and modular storage solutions make so much sense in this platform (Volkswagen Caddy model details). In plain terms, the Caddy gives you enough room to get clever, not enough room to get sloppy.
Fixed platform or convertible setup
A fixed platform has a certain appeal. You build it once, slide gear underneath, and the bed is always ready. That's brilliant for fast overnight stops and simple routines. The downside is obvious. The van starts serving the furniture instead of the other way around.
A convertible setup asks more from you each evening, but it gives the vehicle back its daytime flexibility. For a lot of owners, that trade-off is worth it.
Here's the practical comparison:
| Setup | Works well for | Main compromise |
|---|---|---|
| Fixed platform | Frequent camping, quick stopovers, gear-heavy trips | Less flexible daily use |
| Convertible bed | Shared daily-driver use, lighter packing, mixed duties | More setup each night |
| Drawer-heavy rear build | Organised cooking gear, tidy access from hatch | Adds weight and can crowd the cabin |
| Simple modular boxes | Budget DIY, removable layout, easy reconfiguration | Less integrated feel |
Build around the gear you already own
One couple I spoke with built a lovely platform, then realised their chairs, stove, and recovery gear didn't fit underneath it. They redesigned the whole thing around storage tubs they should've measured from day one.
That's the lesson. Start with your real kit. Not the fantasy loadout.
- Clothes and bedding need soft-access storage, not deep buried compartments.
- Cooking gear works best near the rear hatch if you like cooking outside.
- Tools and spare parts should stay low and secure.
- Daily items like shoes, chargers, and torches need to be reachable from bed.
A lot of good Caddy interiors use removable boxes, folded seats, and a platform that can lift, slide, or split into sections. It's not as dramatic as a full custom camper pod, but it respects what the vehicle does best.
A handy walk-through of compact layout ideas sits well here:
Keep weight and access in mind
The smartest-looking build can still be annoying if you can't reach anything. Test every design choice against a real camping moment. It's dark. It's drizzling. You're half asleep. Can you grab a jumper, find the torch, and crack a window without unpacking half the van?
Build storage for the trip you actually take, not the expedition story you tell at the pub.
That's why the Caddy rewards restraint. Lightweight framing, removable modules, and a bed platform that doesn't dominate the whole cabin usually age better than bulky fixed cabinetry.
Powering Your Adventures A Simple 12V Electrical System
The first time you camp without a proper power setup, you notice it at the worst possible moment. Phone flat. Camp light dead. Fridge warmer than it should be. A simple 12V system fixes that, and it doesn't have to be overcomplicated.
Start with the safe skeleton
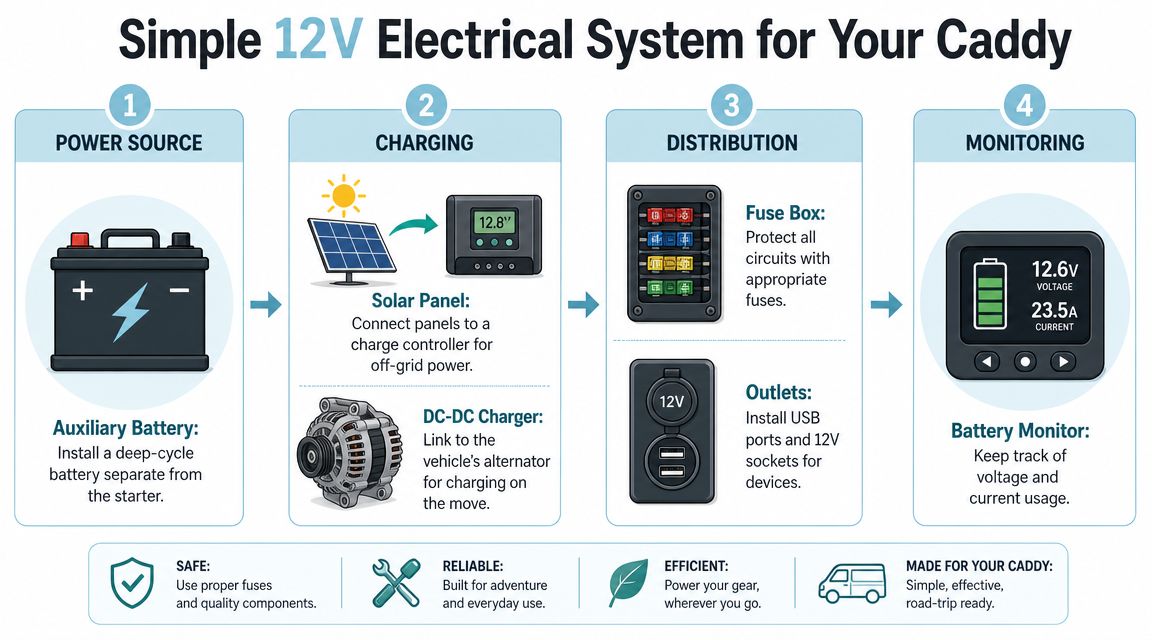
The cleanest small-van systems follow a straightforward chain. An auxiliary battery stores energy. A charging method tops it up. A fused distribution point sends power to your loads. A monitor tells you when to stop pretending everything's fine.
That means your core shopping list usually looks like this:
- Auxiliary battery for lights, charging, and small appliances
- DC-DC charger or equivalent charging solution tied into vehicle charging
- Fuse box for circuit protection
- USB ports and 12V sockets where you'll use them
- Battery monitor so you can see what's happening
A slim battery helps in a tight vehicle. If you're looking at compact battery formats, a slimline lithium battery 200 Ah is one example of the kind of low-profile battery style people consider when trying to preserve storage in a Caddy-sized build.
Build for your real camping habits
A weekend beach setup needs less than a multi-day off-grid touring rig. Don't wire the van for an imaginary future where you're running half a household from the back doors.
This rough framework helps:
| Usage style | Usually needs |
|---|---|
| Light weekend use | Interior lights, phone charging, small fan |
| Comfort-focused trips | Add a fridge, more outlets, better monitoring |
| Longer stays off-grid | Charging input from driving plus solar support |
Solar can make sense if you camp away from powered sites and stay put for stretches. If you mostly drive each day, charging on the move may do more of the heavy lifting. The point isn't chasing complexity. It's matching the system to your pattern.
Wire like you'll service it later
Tidy wiring isn't just about pride. It's about fault-finding and safety. Label circuits. Protect cable where it passes through metal. Mount fuses where you can reach them without dismantling the whole camper.
A neat electrical install feels expensive even when it isn't, because it works quietly and makes sense months later.
Place switches and outlets where your body naturally reaches from bed or the rear hatch. That one decision makes the van feel designed rather than improvised. In a compact camper, every movement counts.
If mains power, advanced charging, or custom circuitry are on your list, get an auto electrician involved. There's no glory in guessing with wiring.
Camp Kitchen and Water Solutions for the Caddy
The nicest Caddy kitchens usually don't look like kitchens at all until the back door lifts. Then out slides a stove, a cutting board, a water container, and the whole thing suddenly makes sense.
A friend runs his setup like an old surf wagon. Rear hatch up. Kettle on a portable burner. Mug balanced on the bumper. Breakfast made from one drawer and one crate. No fixed cabinetry, no lost legroom, no swearing because a cupboard door won't open with the bed folded down.
Rear-hatch cooking suits the Caddy
This van rewards outdoor cooking. You keep steam, smells, and clutter out of the sleeping area. You also avoid filling your compact interior with permanent furniture that only earns its keep twice a month.
The rear of the van can handle a lot with a simple arrangement:
- Slide-out drawer or box for stove, utensils, and pantry basics
- Portable cooker stored securely when driving
- Fridge or quality esky placed for easy access from the hatch
- Fold-down work surface or removable board for prep
That setup feels closer to classic lightweight touring than a full campervan galley, and that's part of the charm.
Water works best when it stays simple
Water systems in a small van can go from sensible to silly very quickly. For most Caddy builds, modular wins again. A jerry can, a hand pump or simple tap arrangement, and a basin for washing up can do the job without swallowing the cargo area.
Good small-van habits matter more than fancy plumbing:
- Separate drinking water from general washing water if possible
- Store containers low so they don't shift
- Use quick-lift tubs for dishes and cleanup
- Pack a grey-water plan so campsites and roadside stops stay tidy
A tiny sink can be handy if it lifts out or shares space with a drawer unit. A permanent sink in a Caddy can also become an obstacle if the build is meant to stay flexible.
Cook for the trip, not the Instagram reel
The most practical meal in a compact camper is often the least glamorous. Pasta, wraps, coffee, something grilled, done. You're not trying to recreate a suburban kitchen. You're trying to eat well, clean up quickly, and keep the van organised.
That old Kombi lesson still applies. Freedom comes from not carrying too much.
If you camp occasionally, portable gear makes even more sense. You can unload the whole kitchen after the weekend and have your ordinary car back by Monday morning.
Finishing Touches and Keeping Your Camper Road-Ready
The van stops feeling like a project and starts feeling like yours. Floor underfoot. Fabric on the windows. A warm light instead of a torch balanced in a cup holder. Tiny details, big difference.
The bits you notice every day
Flooring wants to be durable, easy to sweep, and not too precious. Wet sandals, red dust, spilled coffee, dog hair, sandy towels. The van will wear all of it. A tough floor surface with simple edges usually beats anything fancy.
Wall linings and trim panels also deserve a bit of care. They soften the interior and make the space feel less industrial. Keep colours light if you want the cabin to feel more open. Add darker touches if you want a snugger, cocooned look for sleeping.
A lot of owners finish the space with:
- Blackout curtains or window covers for privacy and temperature control
- Warm LED lighting instead of cold harsh strips
- Net pockets or soft organisers for books, glasses, and cables
- Hooks and tie-down points that stop clutter spreading
If you're the nostalgic sort, the VW personality can subtly manifest without turning the van into a theme park. A subtle tartan cushion, classic-colour enamel mug, or a small shelf item that nods to the brand's history is enough.
For home or shed inspiration rather than the van itself, some enthusiasts also keep classic VW pieces around the workspace. A browse through Volkswagen Memorabilia shows the kind of diecast and décor items VW fans often use in garages, display shelves, or build spaces while working on modern projects.
A short maintenance routine saves hassle
Converted campers loosen up over time. Screws back out. Cables rub. Seals age. The Caddy itself might be reliable, but the bits you add need regular checking.
Run through this before and after trips:
- Check electrical connections for looseness, heat, or corrosion.
- Inspect water containers and hoses for leaks or smells.
- Tighten bed-frame fixings and drawer slides.
- Look for trim wear where panels rub or flex.
- Air out bedding and soft furnishings before storing the van.
- Check that all loose gear is restrained before driving.
A camper stays enjoyable when every trip doesn't begin with a repair.
Keep it legal and sensible
Anything you bolt in, wire up, or modify should still allow the vehicle to be used safely and maintained properly. Keep access to important service points. Don't cover anchors or mounting points without understanding what they do. Don't let furniture create sharp hazards or flying objects in a sudden stop.
That road-ready mindset is part of the old VW touring spirit too. The best adventure rigs are the ones that are packed, checked, and ready to leave again.
Caddy Camper FAQ Cost Insurance and Is It Right for You
The hard questions usually arrive after the exciting ones. Is a Caddy the right base? Is it cheaper to live with than a larger van? What should you budget for the conversion? The honest answer is that a Caddy makes the most sense for people who want one vehicle doing double duty.
Volkswagen Australia positions the Caddy California as a compact camper van rather than a full-size motorhome, which is the right lens for any DIY build too. In Australian testing, the Caddy California TDI320 was reported with claimed fuel consumption of 4.9 L/100 km and averaged 6.2 L/100 km over a four-day local drive. The same test vehicle used a 2.0-litre turbo-diesel with 90 kW and 320 Nm, paired with a seven-speed DSG, and the review also noted a five-star ANCAP safety rating from 2021 (Volkswagen Australia Caddy California details). That combination is why so many buyers see the platform as a credible micro-camper rather than just a van with a mattress in it.
Sample VW Caddy Camper Conversion Cost Breakdown AU
You asked for budget guidance, and care is important in this regard. There's no verified AU dollar dataset in the source material provided, so it would be sloppy to invent prices. A better way to budget is by scope.
| Component | Budget Build | Mid-Range Build | Premium Build |
|---|---|---|---|
| Bed platform | Basic DIY removable platform | Custom-finished modular platform | Professionally finished lightweight system |
| Mattress | Simple foam or folding mattress | Shaped mattress with cover | Premium custom-cut sleeping setup |
| Storage | Plastic tubs and basic boxes | Drawer modules and organised compartments | Custom cabinetry or advanced modular systems |
| Insulation and lining | Essential coverage only | More complete comfort-focused install | Full tidy finish with upgraded trim |
| Electrical | Lights and charging basics | Auxiliary battery with more outlets | Expanded off-grid capable setup |
| Kitchen and water | Portable cooker and water containers | Rear drawer kitchen and improved water handling | Refined integrated modular galley |
| Finishing touches | DIY curtains and practical flooring | Better fabrics and interior detailing | Fully polished interior presentation |
Insurance and registration questions
Rules differ by state, insurer, and how far the conversion goes. A removable setup is usually simpler to explain than a heavily modified fixed fit-out. That doesn't mean you should stay vague. Tell your insurer what's been added, how it's secured, and whether the vehicle remains primarily a passenger or light van configuration.
Ask clear questions:
- Will removable camping equipment be covered?
- Do fixed modifications need to be listed individually?
- Does the vehicle classification change with the conversion?
- Are accessories covered for agreed or market value?
If your build involves electrical work, structural fixings, or permanent changes, keep records, receipts, and photos. It makes later conversations easier.
Is a Caddy camper right for you
A Caddy suits the driver who values discretion, manageable size, and everyday usefulness. It's less ideal for anyone wanting to stand up inside, carry bulky hobby gear permanently, or live on the road for long stretches with home-style amenities.
The simple comparison looks like this:
| Option | Best fit |
|---|---|
| VW Caddy camper | Daily driver plus weekend escape |
| Larger van | More comfort, more permanent camper living |
| SUV with roof tent | People who prefer sleeping above the vehicle and keeping cabin storage separate |
If your camping is occasional, your parking is urban, and you still need a practical weekday vehicle, the Caddy has a strong case. If your trips are long, gear-heavy, or you want fixed internal cooking and bigger living space, a larger van may fit better.
The old Kombi magic was never only about size. It was about possibility. The Caddy carries that forward in a more compact, more everyday-friendly way.
If that mix of classic VW spirit and practical modern adventure is your thing, have a look through Volkswagen Memorabilia. You'll find licensed VW diecast models, Kombi and Beetle pieces, and garage-friendly gift ideas that suit collectors, restorers, and anyone who likes keeping a bit of Volkswagen history close while planning the next trip.